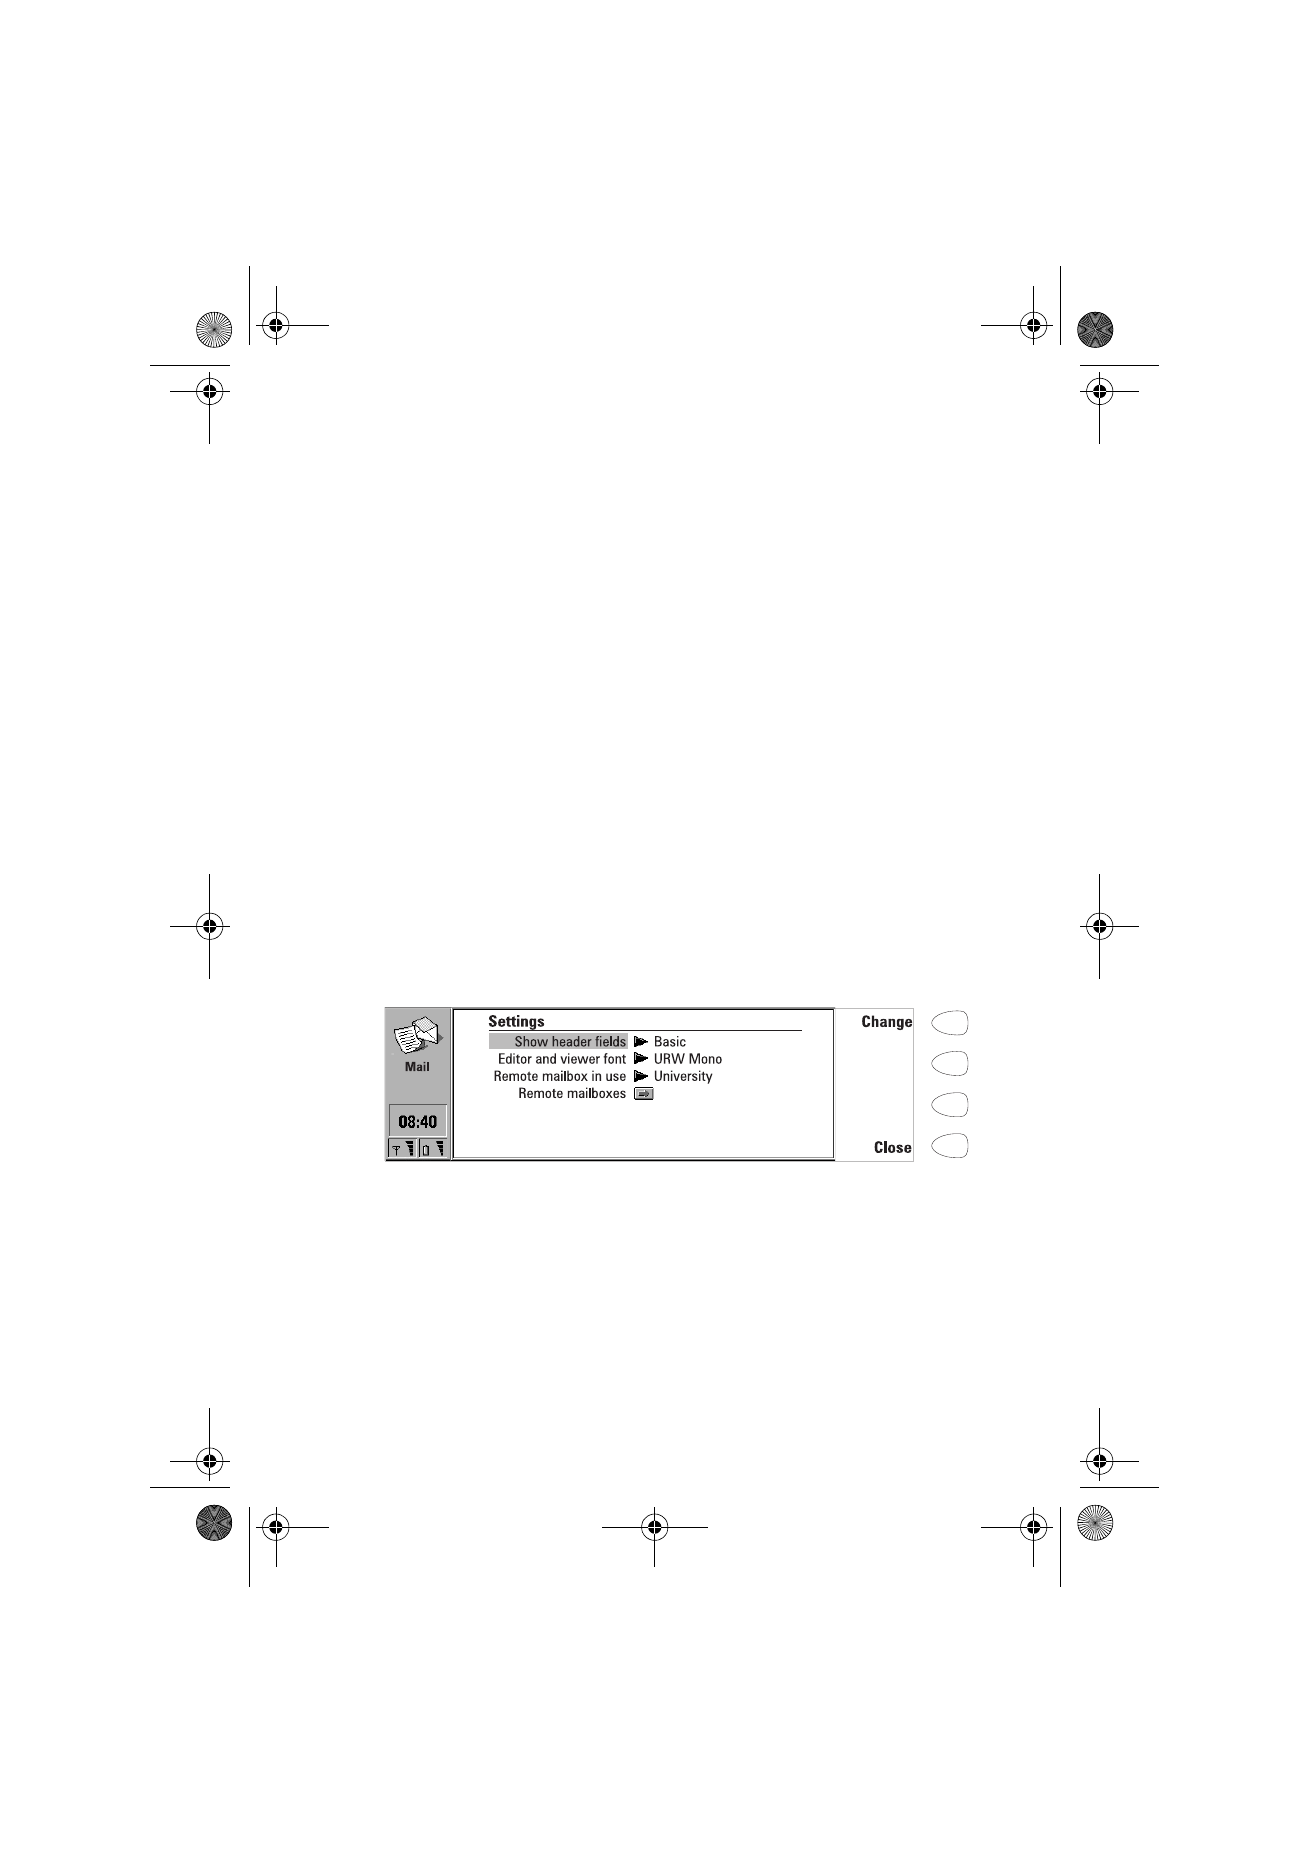
Mail settings
Be sure to define your Internet access point as described in ”Internet settings”
on page 74.
To define the mail settings
1 Press Settings in the Mail main view.
2 Select the item you want to change, and press Change.
Show header fields — The term header field refers to the information given at
the top of an e-mail message. This setting controls which header fields within
the received message will be shown when the message is opened:
None — Shows no header fields, although the sender and the subject of the
message are still shown in the name of the message.
Basic — Shows the Date, From, To and Subject fields.
All — Shows all possible fields.
Figure 2
Um_spock3.bk Page 77 Thursday, June 1, 2000 10:11 AM
78
©2000 Nokia Mobile Phones. All rights reserved.
Editor and viewer font: URW Mono / URW Roman / URW Sans — Determines
the font used in the mail editor and viewer.
Remote mailbox in use — Determines the mailbox to which the connection is made.
Remote mailboxes — Press Change to open the Remote mailboxes view, where
you can add new mailboxes, and edit and remove existing ones. When you
press New or Edit in the Remote mailboxes view, the following options
become available:
Remote mailbox name — Enter the name of the remote mailbox. The name
can be entered freely.
Internet access — Select which Internet access point you want to use for
connecting to this mailbox.
Sending settings — Press Change to define the settings of the mail
messages you send from this mailbox. The settings are:
Own mail address — You must enter the e-mail address given to you by
your Internet service provider. The address must contain the @
character. Replies to your messages will be sent to this address.
Sending host — The IP address or host name of the computer that sends
your Internet mail.
Send mail: Immediately / Upon request / During next connection —
Choose Immediately to send mail automatically; Upon request if you
want to write several mail messages and send them at your
convenience; or During next connection if you want your mail sent the
next time you make a connection to the Internet access point that your
mailbox uses. See ”To send mail” on page 80.
Copy to own mail address: Yes / No — If set to Yes, a copy of the mail will
be automatically sent to the address defined in Own mail address.
MIME character encoding: On / Off — Allows another MIME-compliant
mail system to read the character set used in your communicator. Only
when text containing special characters, e.g. á, ä, ß, is sent to a non-
MIME-compliant mail system, should the MIME character encoding be
turned off. When the MIME character encoding is off, special characters
are automatically converted to ASCII characters: á becomes a and so on.
Signature file — Allows you to add your signature to the mail message.
The signature file must first be stored as a text file in the Own texts
folder, where it is then selected.
Note: E-mail addresses
cannot contain accented
characters, such as é or ä.
Um_spock3.bk Page 78 Thursday, June 1, 2000 10:11 AM
79
©2000 Nokia Mobile Phones. All rights reserved.
Receiving settings — Press Change to define the settings of the mail
messages you receive to this mailbox. Your remote mailbox service
provider will supply you with the required information. The settings are:
User name and Password — These may be required to connect to the
server and to open your mailbox.
The password characters appear as asterisks (*) on the display. The user
name and password stored here will automatically be offered to the
server. If you enter your user name and password incorrectly, you will be
prompted to enter them again when you connect to the Remote mailbox.
If you enter your user name and password incorrectly three times, the
connection to the Remote mailbox will end. For information on how to
change the password, contact your remote mailbox service provider.
Receiving host — The IP address or host name of the computer that
receives your e-mail.
Folder — INBOX is the default folder for your incoming mail. Do not
change this setting without consulting your remote mailbox service
provider. This setting is only available when the mail protocol is IMAP4.
Protocol: IMAP4 / POP3 — Choose the mail protocol your remote
mailbox service provider recommends.
Fetch headers: All / Recent — Determines whether all mail or just the mail
received since the last connection will be shown in the Remote mailbox.
It is possible to have old or unread mail in the Remote mailbox.
Fetch attachments: Yes / No — Determines whether possible mail
attachments are fetched or not. This option is only available if the mail
protocol is IMAP4. Note that text attachments are always fetched.
Delete fetched: Yes / No — Determines whether fetched mail will be
automatically removed from the Remote mailbox. All fetched mail goes
to the Received mail folder.
Timed fetching settings — With this setting you can set your communicator
to fetch mail automatically.
Timed fetching: On/Off — Determines whether the timed fetching
function is in use or not.
Start at: Date and Time — You can specify the date and time when the
communicator starts to fetch your mail. Use the date and time formats
specified in the System settings.
Time limit: None/5/10/30/60 min — You can set the time limit for the
fetching operation. This way your communicator will not fetch too
large messages, which would take too much time.
Um_spock3.bk Page 79 Thursday, June 1, 2000 10:11 AM
80
©2000 Nokia Mobile Phones. All rights reserved.
Frequency: None/ Daily/ Weekly/ Working days/ Every other week/
Monthly — Determines how often mail is fetched.
Size limit: None/5/10/50/100/250 kB — You can set the size limit for the
mail to be fetched. This way your communicator will not fetch too large
messages, which would take too much time and occupy too much memory.