Document features
To name a document
Every time you close a new document for the first time, you will be asked to
enter a name for the document in the input field. The highlighted name in the
input field is the communicator’s suggestion for the name.
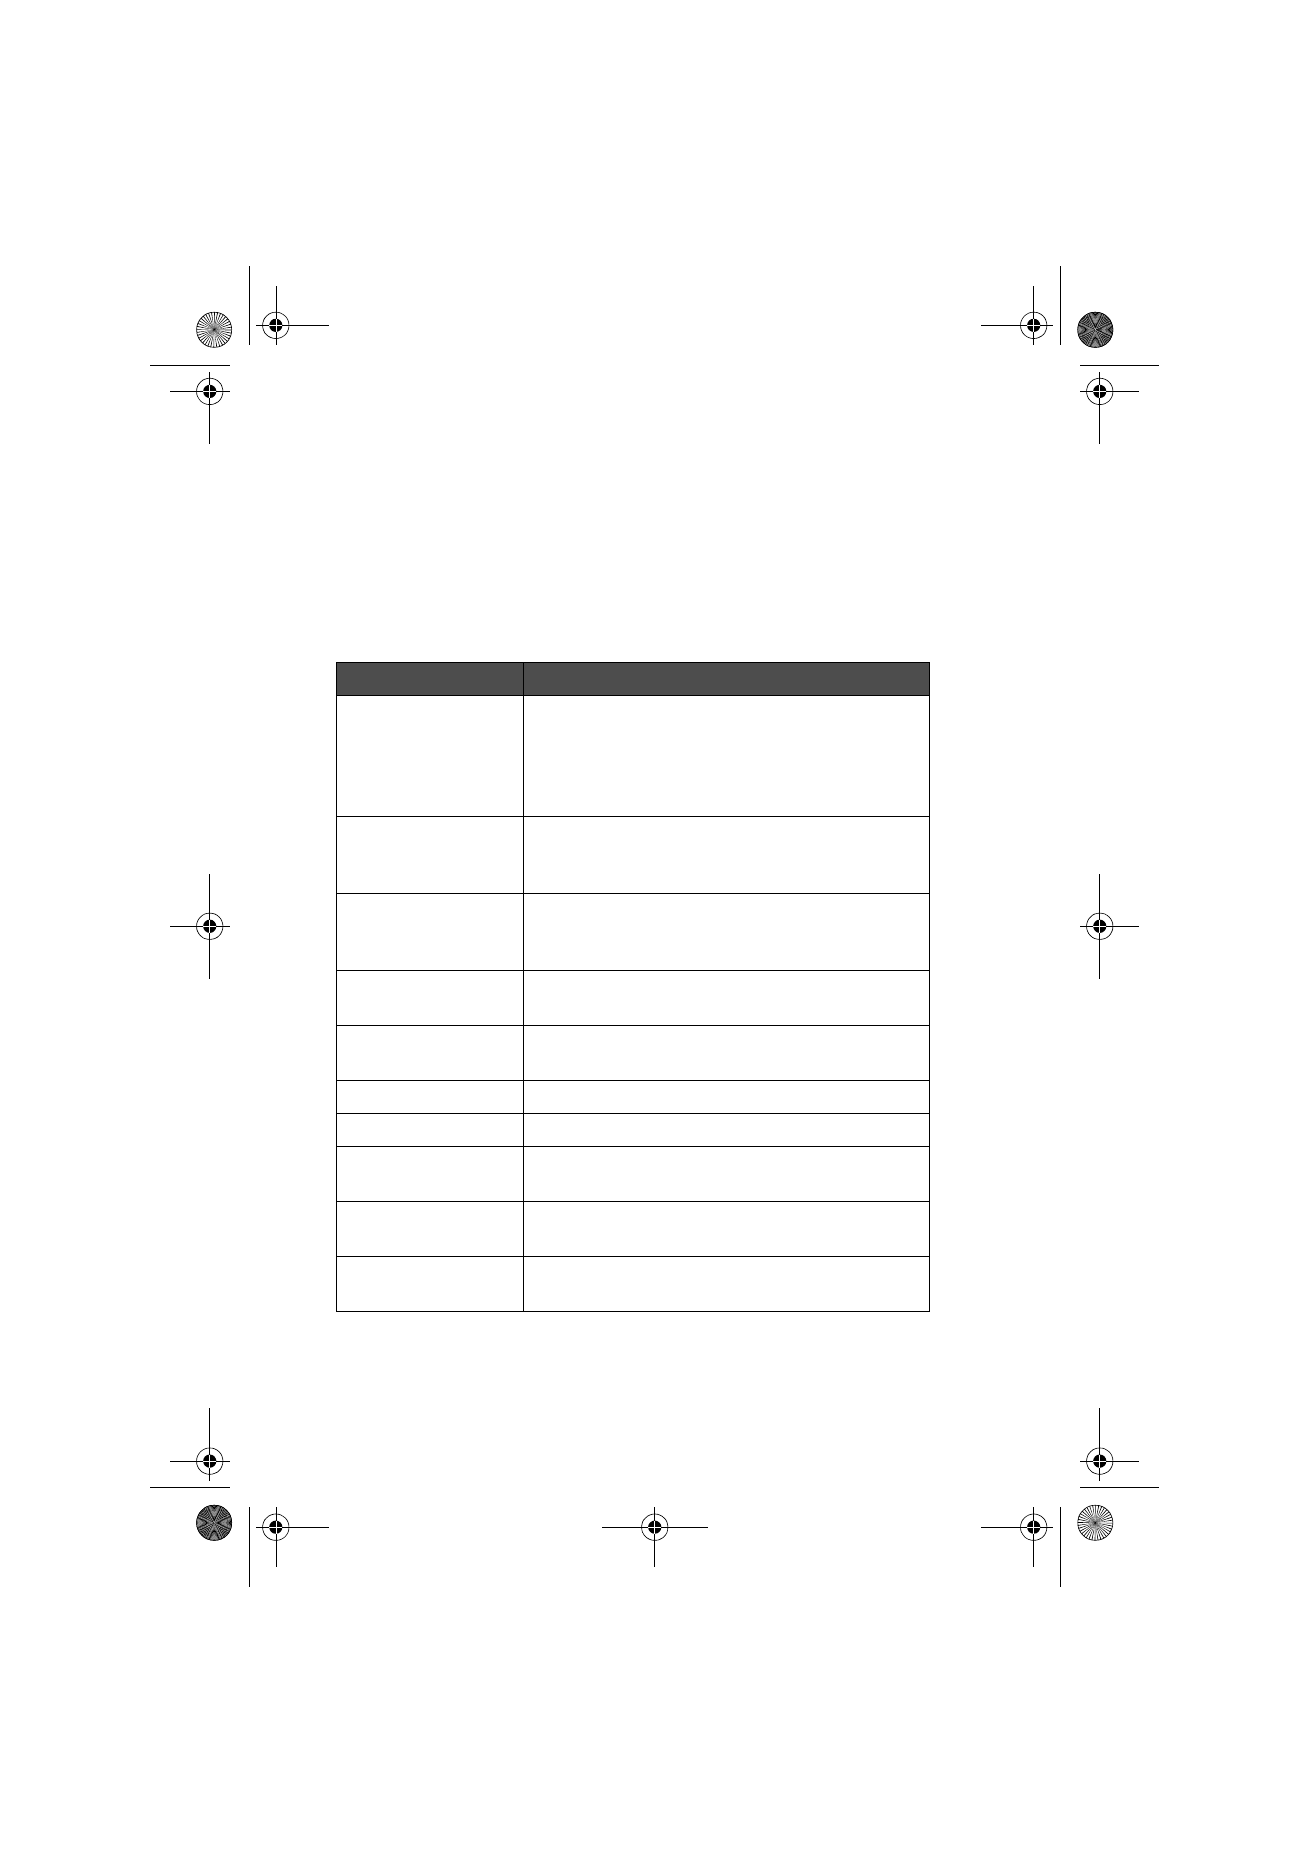
To use shortcuts
There are several shortcuts you can use in the document applications. The
following table lists the available shortcuts:
Shortcut
Function
Ctrl-A
Ctrl-C
Ctrl-X
Ctrl-V
Ctrl-Z
Selects all
Copies selected text
Cuts selected text
Pastes selected text
Cancels the most recent operation
Ctrl-B
Ctrl-I
Ctrl-U
Applies bold
Applies italics
Applies underlining
Ctrl-T
Ctrl-D
Ctrl-M
Adds current time
Adds current date
Adds user’s name
Ctrl-H
Ctrl-E
Moves the cursor to the beginning or the end of the
document
Ctrl-N
Ctrl-P
Opens the next item
Opens the previous item
Chr-left or right arrow
Moves the cursor to the beginning or end of the line
Chr-up or down arrow
Scrolls the list or document view up or down
Shift-Ctrl-left or right
arrow
Selects the previous or the next word
Shift-right/left/up/
down arrow
While Shift is held down, each press of an arrow key
selects one text character or line
Shift-Chr-up or down
arrow
Selects text page by page inside a document
Um_spock3.bk Page 24 Thursday, June 1, 2000 10:11 AM
25
©2000 Nokia Mobile Phones. All rights reserved.
To print
Press the Menu button and select Print. You can print various items, such as
documents, pictures, and SMS messages.
The connection type, header, paper size and the default printer must be
defined in advance in the System settings. See ”System settings” on page 111.
Please, refer to the user’s guide of the printer for detailed safety instructions
on the device.
To change the printing options, press Options in the printing view. The
available options depend on the application you are in.
To print using the infrared connection
1 Go to the System application and set infrared as the connection type. See
”System settings” on page 111.
2 Make sure the infrared port of the communicator faces the infrared port of
the printer. Keep the infrared connection clear. If the connection is
obstructed for too long, for example, if something is moved between the
infrared sensors or the communicator is moved, printing is interrupted.
3 After the communicator has checked that you do not already have an
active connection, it starts to scan for a printer. This means that you
cannot print while you are, for example, transferring files from the
communicator to a PC.
4 If the printer cannot be found, a failure note is shown and the active
application returns to the display.
If the correct printer is found, the printer driver is selected automatically
and the display shows the name of the document and the selected printer.
If the printer found is not recognised, press Printers and select the correct
printer driver.
If the communicator does not have the correct driver for the printer, you
can try printing the document using one of the available printer drivers.
5 Press Start to start printing.
Note: For information on supported printers, see
the Documentation section on the CD-ROM
supplied in the communicator sales package, or see
the Nokia Wireless Data Forum home page in the
World Wide Web at http://www.forum.nokia.com.
Tip: More printer drivers can be installed with
the PC Suite for Nokia 9110 Communicator
program or from the CD-ROM included in the
communicator sales package. See ”To use the
PC Suite” on page 29.
Um_spock3.bk Page 25 Thursday, June 1, 2000 10:11 AM

26
©2000 Nokia Mobile Phones. All rights reserved.
To print using the cable connection
1 Go to the System application and set cable as the connection type. See
”System settings” on page 111.
2 Connect the communicator to a serial printer with the RS-232 adapter
cable DLR-2.
3 Press Printers and select the correct printer driver.
4 Press Start to start printing.
Document outbox
When you send faxes, short messages and mail, they always go first to the
Document outbox. The outbox prepares your document and then sends it via
the phone. If the phone is off, or the cellular signal strength is inadequate, the
document will not be sent until the phone is switched on and the signal
strength is sufficient. If the phone or fax called is off or busy during the first
attempt, the Document outbox attempts to send the document nine more
times. If the sending still fails, the communicator informs you of this with a
note.
The Document outbox can be accessed in the main views of the Fax, SMS, Mail
and Notes applications, where it is shown at the bottom of the folders list. To
open the Document outbox, select it from the folders list and press Open.
The main statuses that documents can have in the outbox are:
Sending — The document is currently being sent.
Waiting — The document is waiting for sending to become possible, e.g. when
the phone is switched on, cellular signal strength becomes adequate, previous
phone call ends.
Retry [time] — Sending of the document failed and it will be sent again at the
time specified in the square brackets.
At [time] — The fax is waiting to be sent at the time you have specified. See
”Fax settings” on page 63.
Sending [current page/total pages] — The number of the fax page that is being
sent and the total number of the pages.
Figure 3
Um_spock3.bk Page 26 Thursday, June 1, 2000 10:11 AM
27
©2000 Nokia Mobile Phones. All rights reserved.
Upon request — E-mail messages may have this status if the Send mail setting
has been set to Upon request in the Mail settings. See “Mail settings” on
page 77. These messages will not be sent until you select one and press Start.
All mail with the Upon request status will be sent during the same connection.
To speed up manually the sending of documents that have the Waiting, Retry,
At [time] or Upon request status, select the document and press Start. The
document(s) will be sent as soon as possible.
A document is removed from the Document outbox if sending succeeds or you
cancel the sending by pressing Cancel sending.
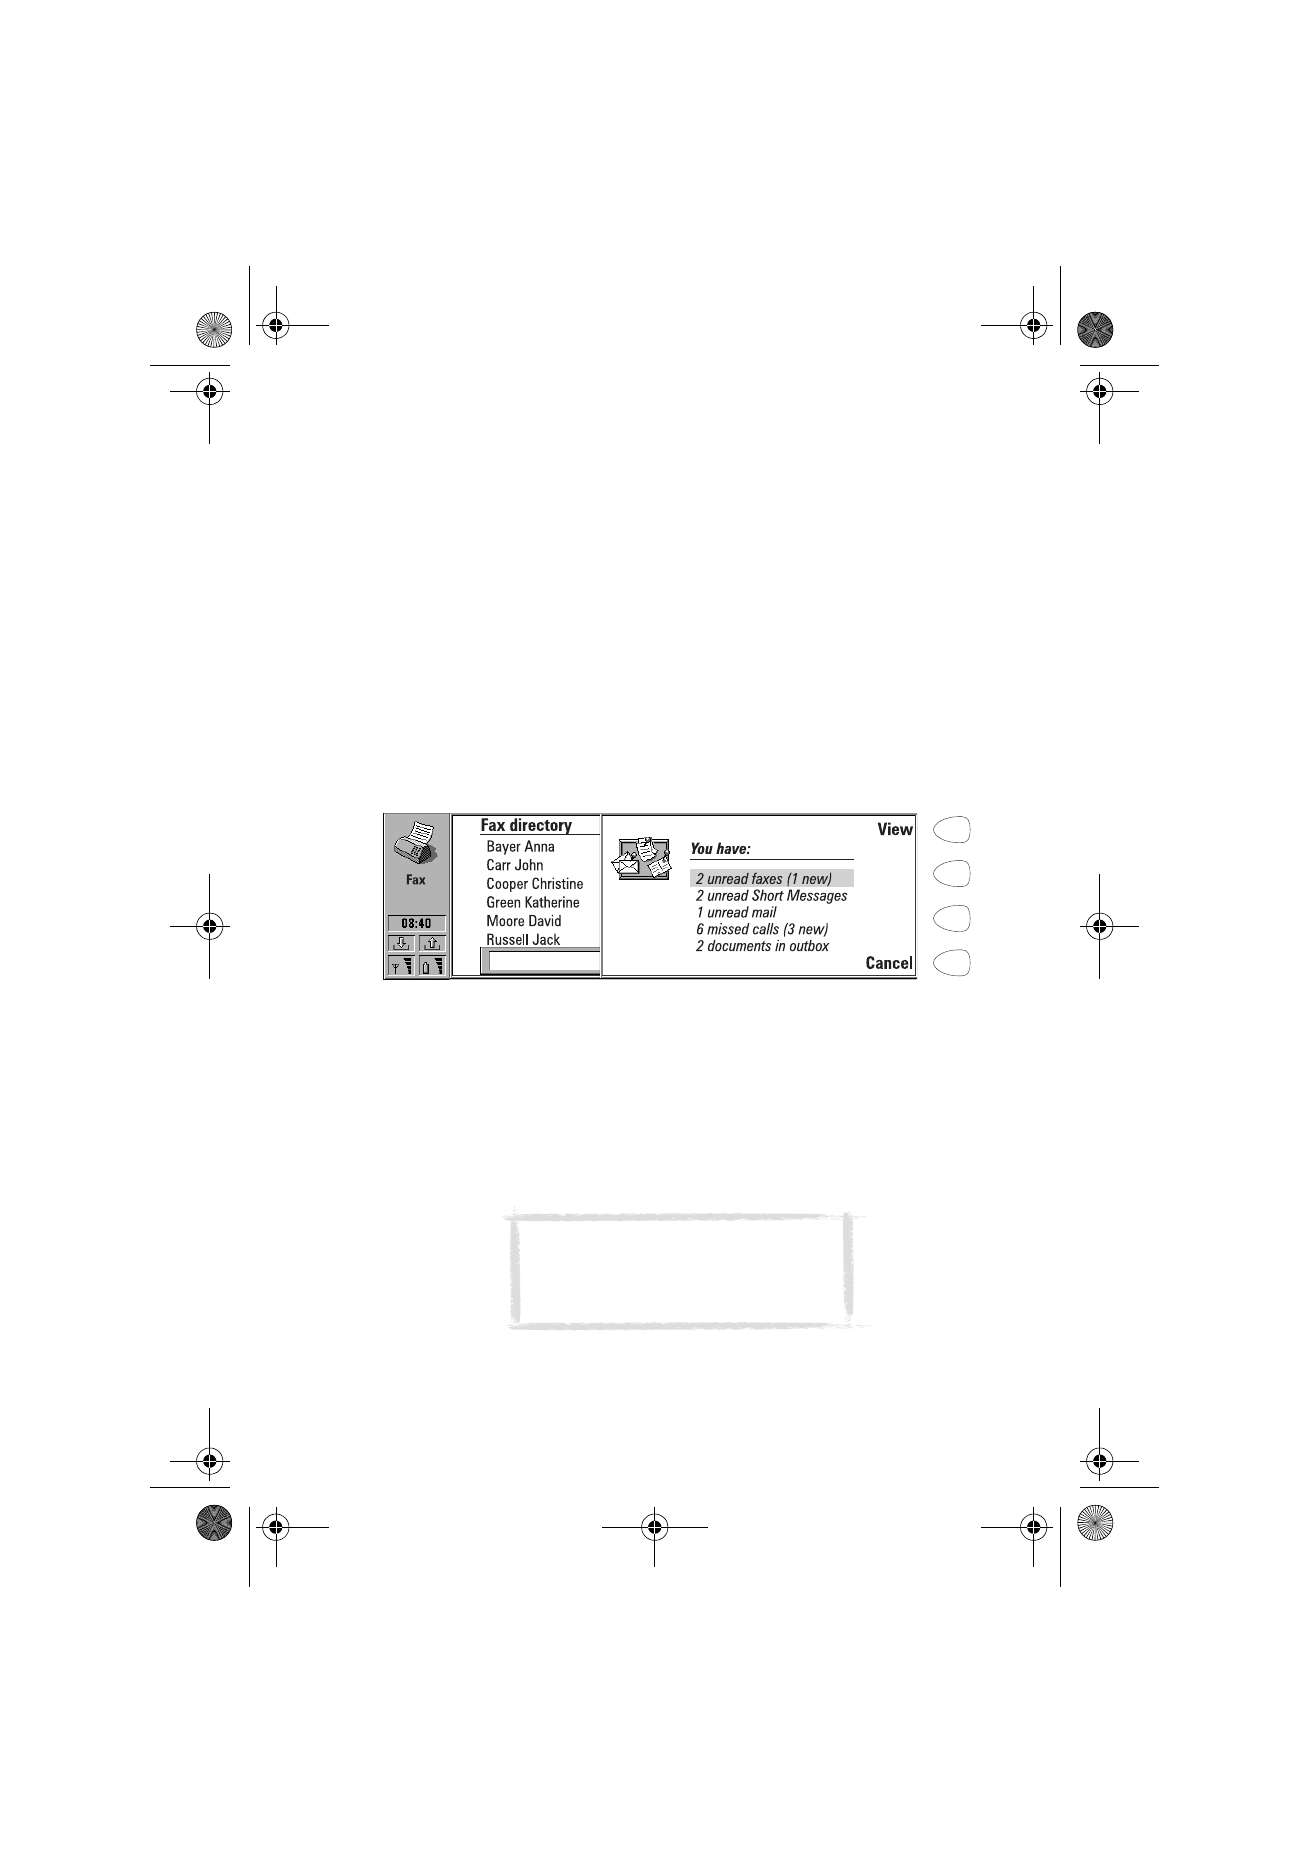
Received communication note
When you open the cover of the communicator and have missed calls,
received faxes, short messages or mail, or there are unsent documents in the
Document outbox, a note will be shown, see figure 4. The note can be
dismissed by pressing Cancel.
To read the received documents or to check who has made the missed calls,
select the corresponding item on the list and press View.